Sunday, July 31, 2011

More 16-patches


Blocks made yesterday and today.  I'm more inspired by these fabrics and this project than I am with anything else that's lying around trying to make me feel guilty.

Sara

Gratitudes:

Verlander got another win for the Tigers
Cardinals on TV tonight
Went to church and the Rector announced, "No sermon today."

Saturday, July 30, 2011

Making four 16-patch blocks at a time

So here are the details.
I choose four of the ten inch square fabrics from the Layer Cake and carefully stack them: right side up, right side down, right side up, right side down.


Then I cut them into 2.5" slices.


I sew two sets of each of these pairs together,  and then I re-arrange the other strips so each fabric is matched with a different fabric than the first set.  See below how the two red strips are matched once with the two green and once with the two purple.  This will give me different final checkerboards instead of two that are the same.


I sew the matching pairs of strips into four Rail Fence blocks and press.


Next, slice the Rail Fence blocks into four 2.5" strips perpendicularly.  Flip every other one top to bottom.


Sew each set together and press again.


There they are;  four at once!  And each one is a different pairing of fabrics.

Sara

Gratitudes:

Fresh raspberries and blueberries for breakfast
A dry day, and the humidity not too bad either
Charlie baking cookies to send to our camper

Friday, July 29, 2011

Using up a "Layer Cake"


I received this Moda layer cake of 10" squares as a lottery gift from Margaret's Hope Chest.  Now I see that another of their friends, Amanda is leading an internet workshop on 36-Patch blocks.  They look really fun set right next to each other.

But I don't want to use that many pieces on my next project.. . . so I'm making 16-patch blocks from the layer cake.


It's pretty quick to make four at a time, so in 10 batches I will have used up all the fabric and have 40 blocks. That's enough to make a 48" x 48" center [6 blocks x 6 blocks] and have 4 left for cornerstones in the borders.

And not too much THINKING will be necessary.  A good thing in this high heat and humidity.

Sara

Gratitudes:

Oscillating fans
Ice cube maker
Airconditioned public library

Thursday, July 28, 2011

New Baby Boy quilt


 Two different groups that collect quilts for kids say that they quickly run short of quilts for BOYS.  When I saw these two fabrics I imagined a simple strip quilt, and I have now sewn one set together.

Now to get a backing and do a quick quilting job.

Sara

Gratitudes:

No more rain after sunrise today [5 inches yesterday!]
Once again survived exercise class
Leftovers made a good, cold supper

Tuesday, July 26, 2011

SCRAP Bee for August

I got to work yesterday and cut out hearts for the SCRAP Bee. In this Bee we must start with "made" fabric.  So the hearts are cut out from the "made" fabric.

 I zig-zagged them down onto the pieces of red and pink fabric that were provided for the background.  I then put them in an envelope and addressed it.  I set the envelope on the kitchen counter to mail the next day or two.


Then I went to my computer and read the post by Victoria and looked at HER hearts in the photo.
Hmm, she only used red and pink fabrics for  HER hearts. . . . .  Was that what I was supposed to do too?  Maybe I had better go and read the original instructions which came out a while  ago.  Oh, no!  She did say "Use your red and pink fabrics"!  Guess that didn't stick in my memory.

So how do I preserve the background fabrics ?  Think, think, think.....


Oh, yes.... REVERSE applique.

I cut CAREFULLY around the "wrong" hearts.  I made a bigger piece of made red & pink fabric and put it UNDER the hole.  Then I did the zig-zag thing again.


All fixed.  Even made a couple small ones.
Back in the envelope.
Ready to mail tomorrow.

Whew!  Glad I caught that error before I mailed them out!

Sara

Gratitudes:

Beautiful summer day, only up to about 80 degrees.
Dinner was fish Marti caught in our own lake
The four of us went to performance of HONK 

Sunday, July 24, 2011

LRR, Round 4 finished on 2 sides


The fourth step of the Liberated Round Robin [a "nested" round robin, which means it stays at home for the whole process] is "Strips or Strings".  I had a long band of red and white strips that were left over from an earlier project.  I had sewn the little pieces together as Leaders and Enders during that project, and the band was in my Orphan Box.  I added a ticking strip on each side.

Current size is 25" X 43".

The next step is already announced as "Curves", so I will make something for the two long sides.

----------


First of the tomatoes to start reddening!

Queen of the Prairie in bloom.


Sara

Gratitudes:

BLT for lunch with local tomato
Progress on SpoolSpinners' quilt idea for Guild raffle
Lots of people came to raise money for Sue Brown tonight

Thursday, July 21, 2011

LRR, Round 3 finished on 4 sides


Finished this round tonight, and quilted the last [bottom] border after adding it.  I wasn't sure I wanted to add on all four sides, so there was an "incubation" period while I watched a waited for direction.  Finally with the change in colors and size, it seemed like the right thing to also add a bottom border in squares.

The top squares are printed on the fabric, so no complicated construction was required.  I liked the idea of having one "regular" set of checkerboards that were NOT wonky to show that this was indeed intended to be a "squares" border.

The other three borders were pieced in a slightly wonky way.
So far the "quilt as you go" method is working well.

--------------

Family vacation without a sewing machine made for little quilting in the last 2.5 weeks.  Now I'm back at work, and hope to finish a new baby quilt soon.

Sara

Gratitudes:

Attic fan to cool house in the hot evenings
A/C in the cars
Eye doctor says no shot needed this time
Family birthday party for Samantha

Friday, July 8, 2011

Liberated Round Robin, Step 3

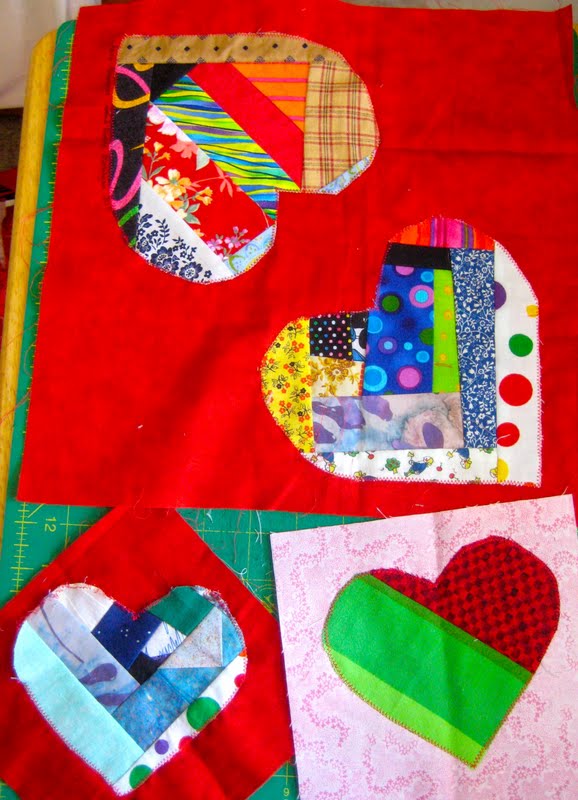
I've been making squares for the next step of the Liberated Round Robin on the internet.  And I decided that the paisley print on the bottom was making my next decisions difficult.  Took it off and replaced with polka dots.

Then I added some plain red small borders to rest the eye between triangles and square-to-com.

Then I read Melody's posts about Quilt-As-You-Go borders.  Why, I could do that with this whole quilt.  Round Robins are just adding one border after another!

So I was distracted by the need to quilt what I had for the middle already before moving on.


Here's where I am on that right now.


But I just couldn't wait to add a border in the quilt as you go method.
This is how you do it:
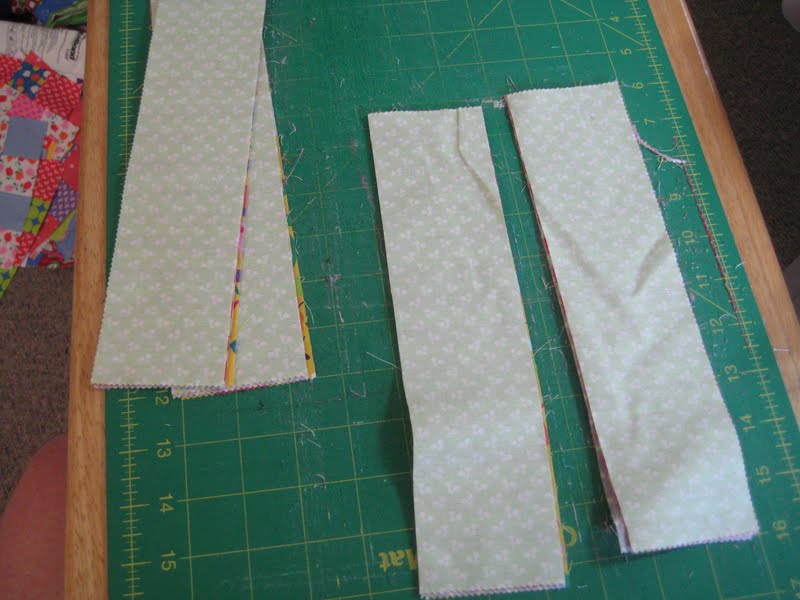
Top border fabric [black and white check] face-to-face with the top; backing border fabric [green] face-to-face with the back.  Pin all three edges together.  No batting at this point!

Sew these three layers together.  I'm using a quarter-inch seam.


Now take your strip of batting and BUTT it against the edge of the three fabrics you just sewed together.  Using a zig-zag stitch sew together, just catching each side without overlaping them.

Here's what it looks like when you are done.

Then you flip the two border fabrics over that seam and press.

Now you quilt this border.

Trim off the excess batting and fabric.

Front has grown by one border side [black and white check].


And the back has grown by one border side [darker green].


-------------------

Today we are leaving for a week of vacation at a cottage near South Haven, Michigan. We will be nine family members together. I'm on duty with the oldest grandchild to make dinner tonight.  After that I'm going to enjoy the dinners cooked by other teams of two.

Sara

Gratitudes:
Family able to be together this year
Finished my reports for our Board meeting
Garden flowers in bloom